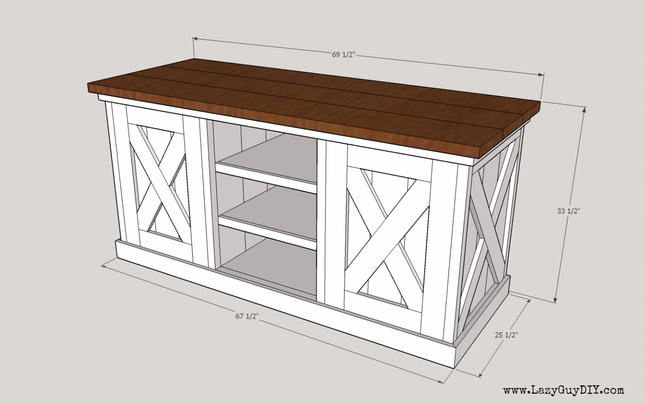
You need a media console that’s how big? That’s seriously the same size as the luggage Tom Hanks had in the movie Joe Vs. The Volcano. If you don’t get that obscure reference, let’s just say this thing was going to be a massive entertainment center. Almost 6′ long and over 2′ wide. Like a tall coffin… with rustic farmhouse styling. Ha. Mark this date, farmhouse style coffins are going to be a trend in 2017. All it will take is one mention on Fixer Upper that Joanna wants a ship-lap coffin and everyone will have one.
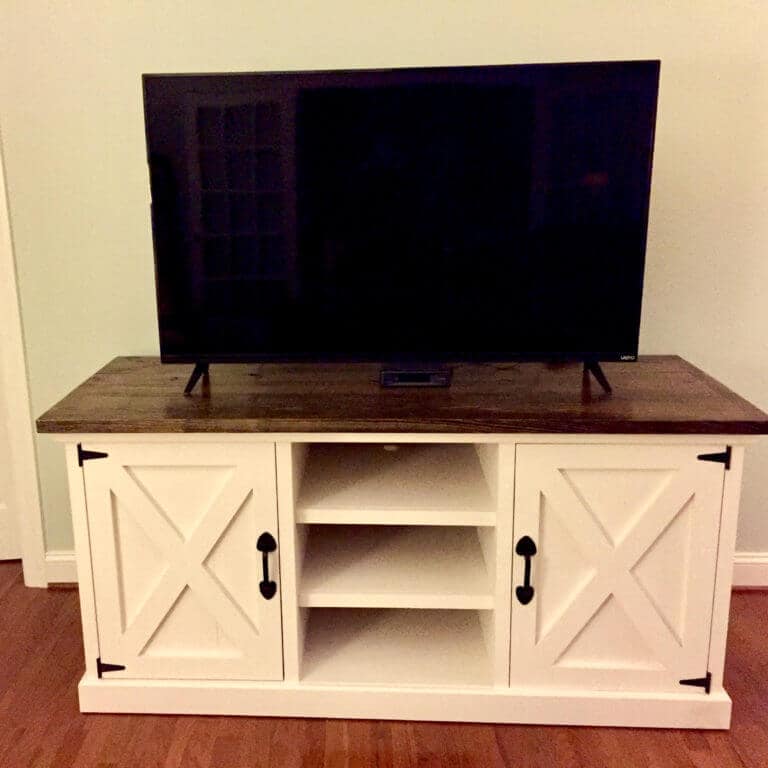
Leonard Media Console
So let’s talk about this build. Thankfully the new owners were super patient with me because this took me several months to actually finish. I checked, and the very first picture I took of this project was September 5th. It went to it’s new happy home on November 6th. That’s not to say this is a difficult build. At this point I could knock a new one out in about two weeks (with my limited free time) from start to finish. Sometimes on new builds you get a combination of frustration, fatigue and waiting on a specific tool to do the job right. That’s about how this went. I actually put this one on hold, built two different projects and then came back rejuvenated. Sometimes you need to step away. Which is why you should NEVER give yourself a tight deadline on a project. Give the excuse that it’s “custom” woodworking and that takes time. It makes you sound professional… So on to the build!
Tools Used
*I am merely “suggesting” you use these tools and also providing the exact tools I used for this project. You don’t have to use the exact same tools as Lazy Guy to get the same results, but it will probably help. I should also mention the blue links below are affiliate links, so if you click and purchase you’re on your way to supporting your favorite DIY’er.
- Miter Saw
- Table Saw
- Drill/Driver
- Kreg Jig
- Nail Gun
- Palm Sander
- Clamps and Clamps and more Clamps
- Router (optional)
- Thickness Planer (optional)
- Speed Square
- Wood Glue
Material Needed
- (4) 1″x 2″ x 8′
- (2) 1″ x 4″ x 6′
- (3) 1″ x 4″ x 8′
- (1) 1″ x 6″ x 6′
- (8) 1″ x 8″ x 8′
- (5) 2″ x 2″ x 8′
- (3) 2″ x 4″ x 8′
- (3) 2″ x 10″ x 8′
- (1) 0.75″ 4′ x 8′ plywood
- (3) 2′ x 4′ under-layment (back paneling)
- (2) Everbilt 7 1/2″ Black Heavy Duty Gate Pull
- (2) Pair of Everbilt 3″ x 3″ Black Tee Surface Mount Hinge
Don’t feel like reading? I actually put together a video of the entire build. It’s something new I’m trying that has a combo of pictures and video with the steps spelled out. Hopefully this helps!
Step 1 Assemble The Frame
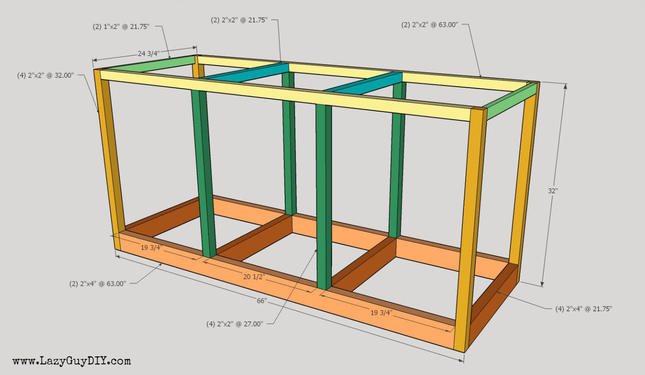
I made a peculiar choice in the design here right from the get go that I honestly don’t remember doing but it actually turned out fairly well (I really just blacked out and the ghost of Bob Vila told me what to do, funny because he’s still alive..) You’ll notice on the top outside ends (Sea foam green) I used a 1″x 2″ instead of a 2″ x 2″ or 2″ x 4″. The reason for this is because when you attach the outside panels in the 3rd step, they’ll slide right in behind and you can easily attach them with a brad gun. I really should have done this for the bottom outside frame as well. But I didn’t, thus, the plans reflect that. One thing I absolutely recommend if you have the option, is to use a thickness planer to square off the 2×4’s you use. The rounded edges make it difficult (impossible) to have a flush edge when you put the bottom panels in (without lots of filler or caulk). Or you can skip that step like I did, and just hide your mistake later with a piece of thin plywood underlayment. Ha. Attach all of your 2x material with 1.50″ pocket holes with 2-1/2″ pocket screws and your 1x material with 0.75″ pocket holes with 1-1/4″ pocket screws. Start from the bottom and work your way up. And absolutely use a speed square to check your sweet baby angles. If you’re not square from this step, everything else will be a lot more difficult going forward.
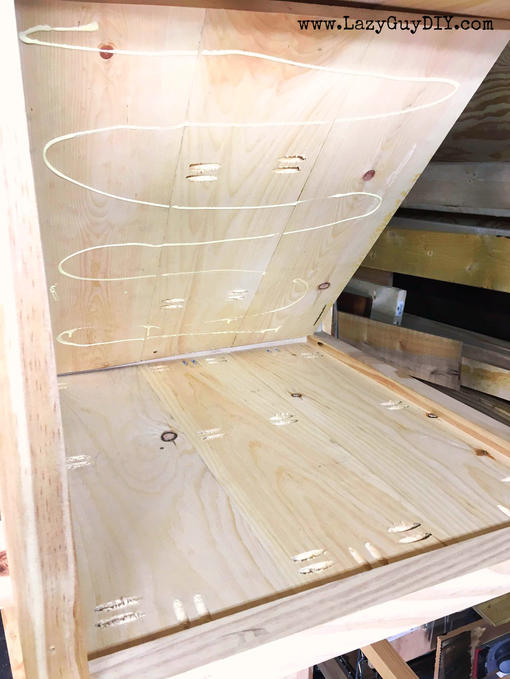
Step 2 Attach Floor Panels
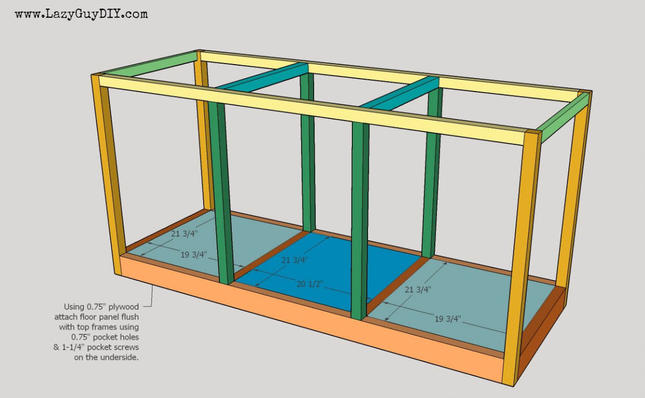
I know you’re expecting some sort of clever pun from me here, and frankly I’m floored you give me that much credit to have one prepared. I’ll just move forward and say cut out your plywood panels to fit the bottom of the unit. The outsides are slightly smaller than the center, so don’t make the mistake of cutting them all the same width. Depth is fine. You want these to sit flush with the top of your framing. You can attach them with 0.75″ pocket holes and 1-1/4″ pocket screws from the underside (because saying bottom makes me giggle). This is where the squared 2×4’s come into play because of the rounded edges of the framing lumber. You can cover the gap up with wood filler, caulk or a sheet of underlayment if you need to at a later step.
Step 3 Outer Panel Assembly & Attachment

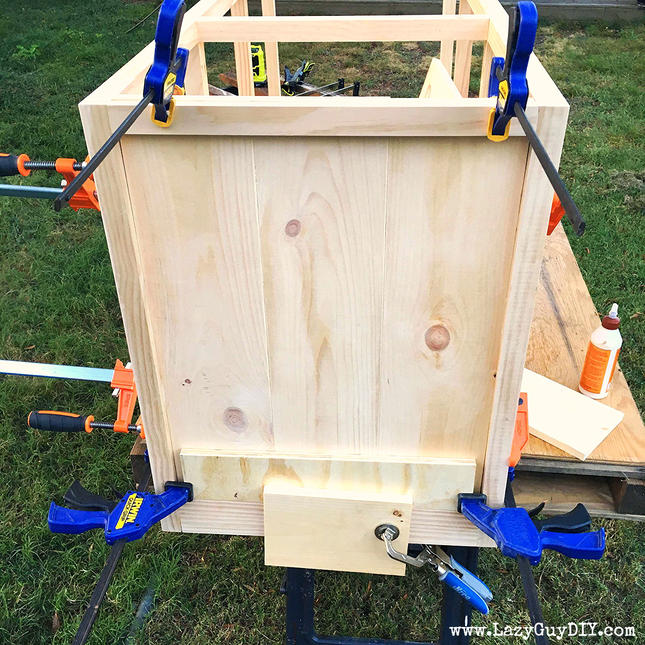
Remember the ghost of Bob Vila giving me guidance earlier? This is where that step pays off. Thanks Bob! (even though you’re not dead or a ghost…) Cut (3) 1″ x 8″ to length at 28.50″ and attach them together with 0.75″ pocket holes and 1-1/4″ pocket screws to make a panel. An optional step I added before I attached the boards together is I took my sander and rounded the inside edge where the boards would attach. This pronounces the seam when joining the boards together to really give that “farmhouse” look. With the panel assembled, add additional 0.75″ pocket holes around both outside edges and the bottom edge for attaching to the frame. Pop the panel in and attach it with the pre-drilled pocket holes and 1-1/4″ pocket screws.
**Tip for Assembly – Use a 1x (0.75″) spacer and some clamps to make sure the bottom edge leaves the same exposure as the top when you attach it with pocket screws in the floor panel. I clamped from the outside like the picture below. The X trim is made out of 1×4 that’s 0.75″ thick and you want it to be flush with the frame when installed over the panel.
Step 4 Inside Panel Assembly & Attachment
This step might seem a little silly to some people, but I honestly have good reason for doing what I did. I’m “lazy” so why would I intentionally give myself more work?
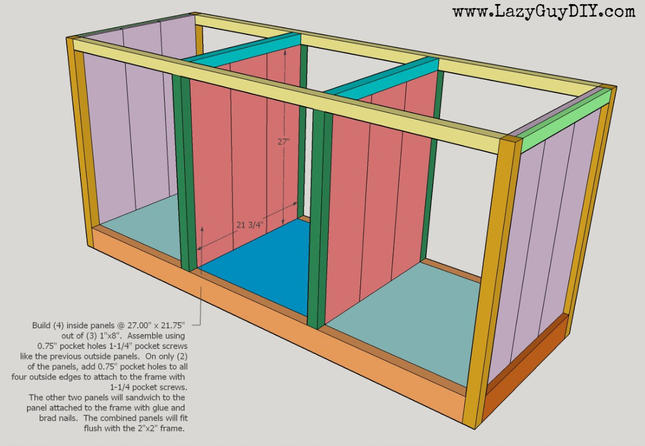
Inside panel assembly is going to go just like outside panel. However, these will be only 27.00″ tall. Plus, you’re going to make four of them. Yes. I said four. For frame two gaps. Inside panels are the life of the party, so they’re allowed to bring a friend… that looks exactly like them… twinsies!
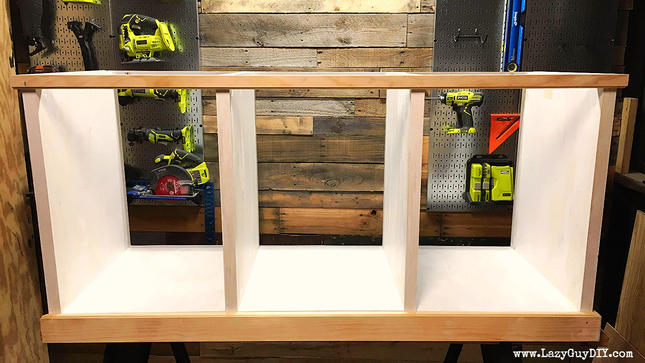
Anywho, two of these panels need 0.75″ pocket holes around the entire outside border. You can see in the picture below the bottom panel has pocket holes around the border while the top panel has none. You will attach one on each inside open frame with 1-1/4″ pocket screws flush with the frame. Pull out every single clamp you own to make sure the panel sits flush with the inside frame. I honestly added more clamps after this picture was taken for good measure. Once you attach this panel you’re going to attach the second panel (without pocket holes around the edges) with a brad gun and wood glue. The important thing here is that you want to make sure both sides are sitting flush with the frame. The 2×2’s are 1.50″ thick and 1x material is 0.75″ thick so if you carry the 4 and multiple by 6… you get 1.50″ thick. This is yet another opportunity to pull out EVERY SINGLE CLAMP YOU OWN. This was probably the biggest pain in the entire build because I had minor warp in my boards which meant when I put these two panels together they didn’t exactly sit flush. I had to clamp and clamp and clamp some more, attach with brad gun and let it sit until the wood glue dried. When I removed the clamps too soon with only the brad’s attached, the panel began to pull the warp out again. So yeah.. I had to wait in between each assembly. If only I had more clamps…
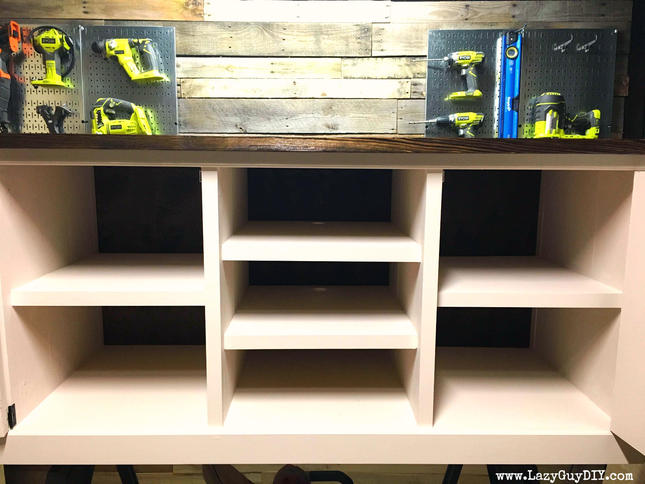
Step 5 Shelving
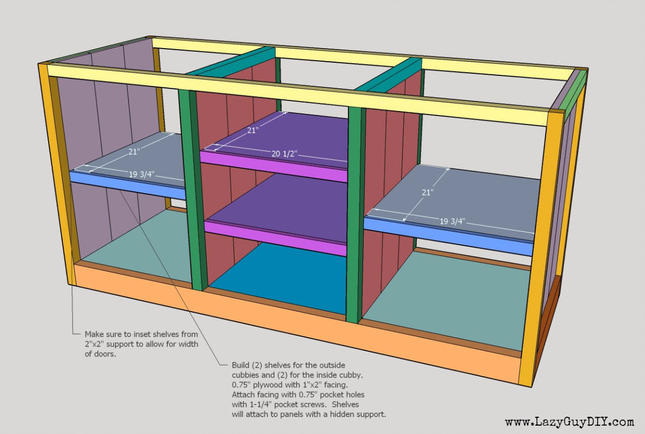
Hey Lazy Guy you jerkface, I clearly see in the pictures that you’re going out of order. Meh. Do as I say not as I do! I did give the entire unit a primer coat (or two) and add the trim prior to this step. I’d recommend the primer, but follow my order for the trim. Once again the outside cubbies are a different width than the inside cubbies. That was intentional… Cut all the plywood shelves to 21.00″ deep (outside shelves 19.75″ wide & inside shelves 20.50″ wide).
 The reason for them being only 21.00″ is that you want to leave enough clearance for facing of your shelf and these thick ol’ doors you’re going to build so they close flush on the outside. The facing is a 1′ x 2″ cut to the same width as the plywood and attached with 0.75″ pocket holes and 1-1/4″ pocket screws. Here’s where the fun begins. My shop floor isn’t level, thus my project isn’t level. So normally you’d throw a level on a shelf and call it a day… Not so much here.
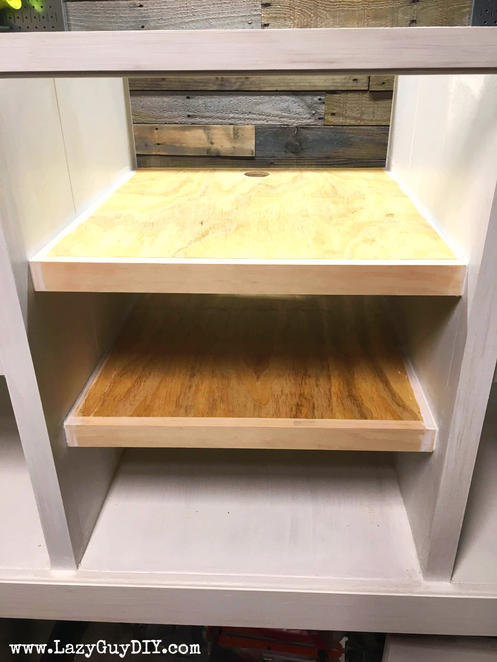
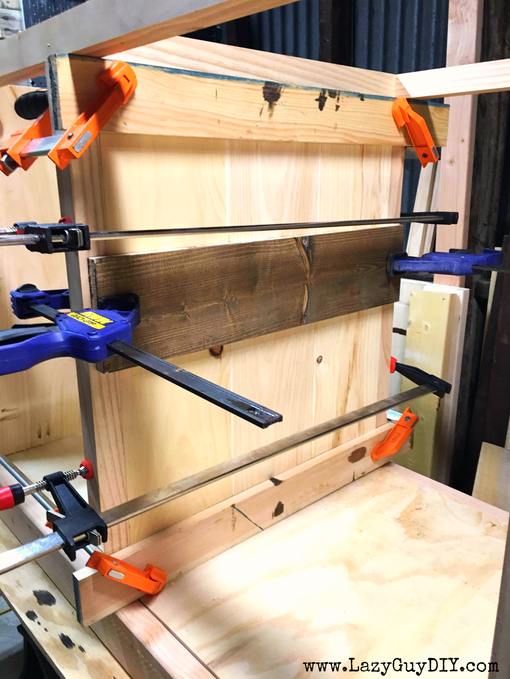
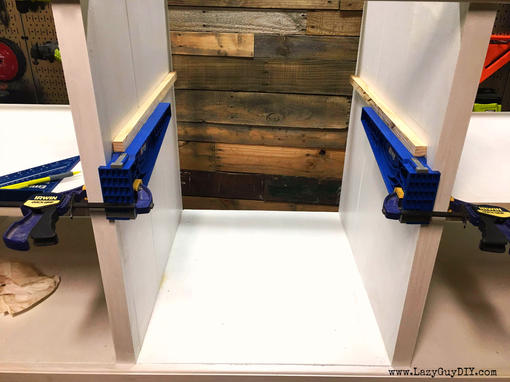
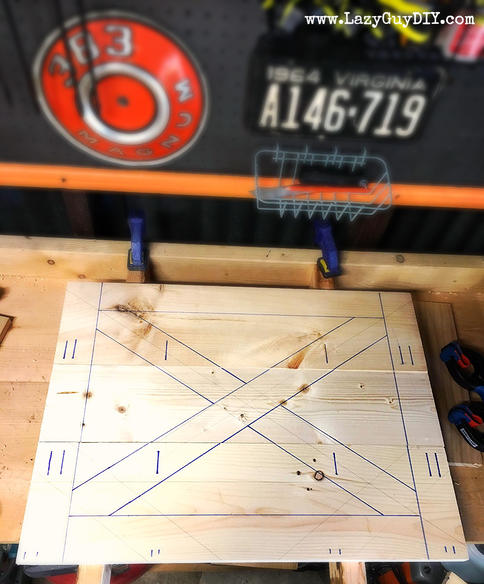
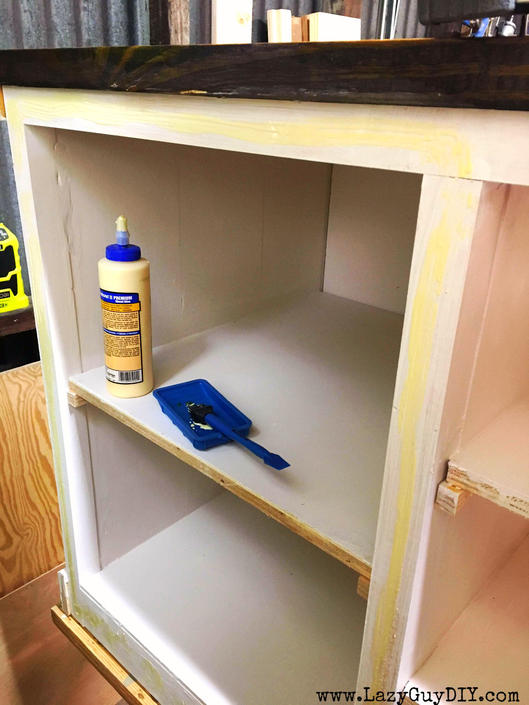
So I used Kreg Jig’s Drawer Slide Jig to assist me (pictured above). This is not what the product is specifically used for, but darned if it didn’t work. You can do the same with with a speed square and a set of clamps, but I already had these so…. I used them to level a scrap piece of 1×2 I cut in half as a shelf support. When I had the desired height, I glued and nailed them in place with the brad gun. The shelf then slides right on top and attaches with wood glue and brads from the top. I then caulked all the edges in case there were any gaps. This is also a good point to patch any of your pocket holes you want to cover up with wood glue, sand them down when they dry and then prime the unit. I used DAP color changing wood filler (like the kid’s sunscreen that turns purple) and Kilz for the primer. You might also note there’s a hole in the top shelf (this is the middle part of the unit). This was not by accident nor did it occur naturally through the grace of mother nature (plywood ain’t natural…). This is a good time as any to use a spade bit, hole saw or forstner bit to cut holes for wires for your electronics. You always want to cut holes from the top (visible side) down through the hidden side. Plywood occasionally has blow outs and you don’t want that on the visible side of your piece.
Step 6 Install Trim Pieces
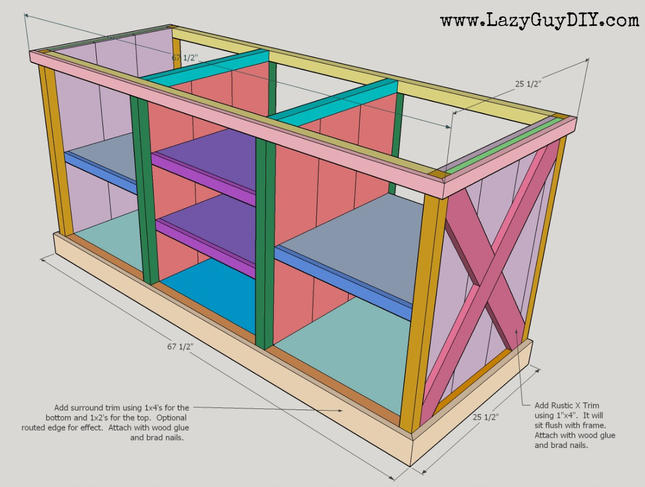
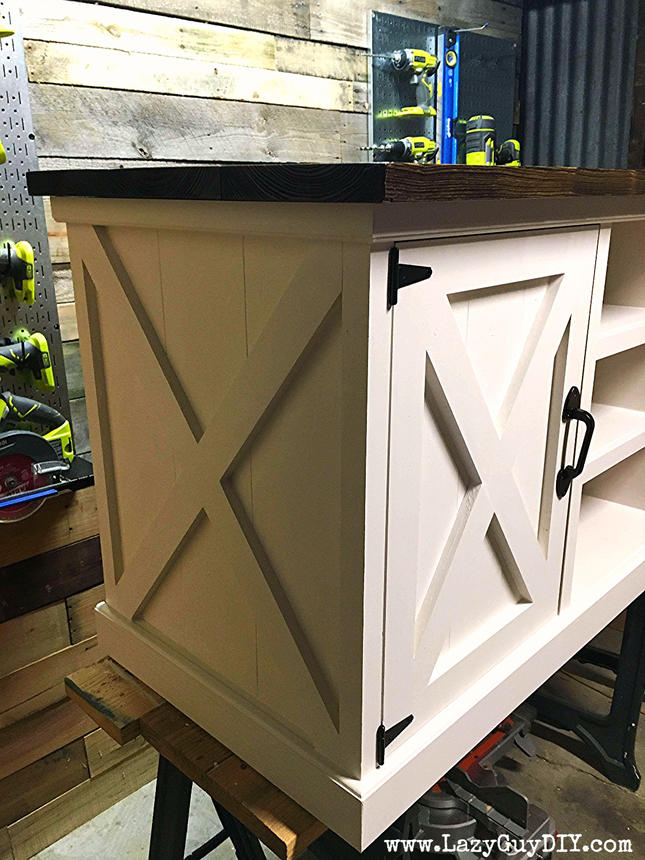
Okay, let’s start with the scary part first. Installing the X’s on the side was not very fun. There’s probably a good method for figuring these sweet baby angles out, but I never found it. I searched the inter-webs like crazy and then said, okay, I can do this myself. And eventually I did. What I ended up doing was marking straight on the panel where my X-trim would be going. I ran a center line from corner to corner on the panel and then took a scrap piece of 1×4 with a line drawn down the middle. From there I was able to accurately line up the scrap piece of 1×4 and the guideline drawn on the panel and correctly outlined my X on the console with perfect 1×4 X’s. If this sounds confusing I have better pictures on the door build in step 7, plus it’s in the video for the doors as well. I wasn’t about to put hours of me walking back and forth and cussing on video until I figured it out. Ha. Once I had the accurate outline of the X’s drawn on to the panel, it was just a matter of measuring and cutting, dry fitting and re-cutting. It’s a pain. Just remember, that whatever your angle is that you cut with your miter saw, the other angle you cut will make the corner a 90 degree angle. There won’t be any weird angles here because your media console is square (hopefully). Get the single piece of the X fitting snug and then go ahead and cut the pieces for the two other pieces. The angles should be exactly the same as the previous piece, you just need to cut a 1×4 sized gap so the single piece can run through the middle. Once I had my end angles cut on the second piece, I just marked where the X intersects, cut out the 1×4 gap (leaving a little extra length on my pieces) and then dry fit and touched up until they fit snug. I went back and caulked all my edges (or slight gaps) so when I primed there would be no seams.
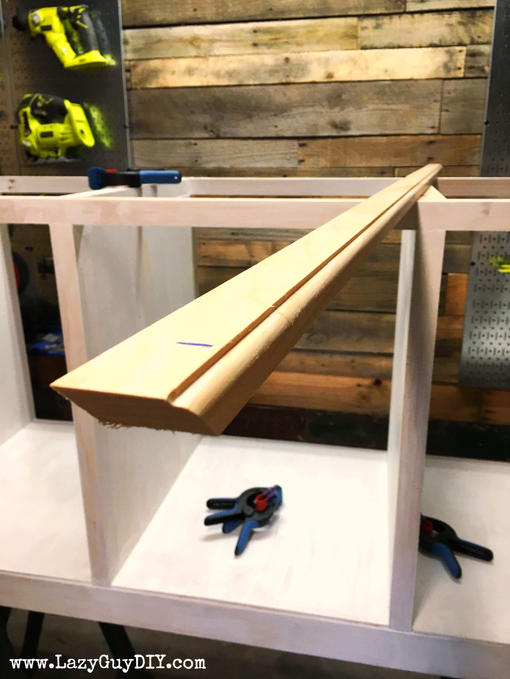
Now for the easy part! The top 2×2 and bottom 2×4 get trimmed out. No, I did not say “tricked out”. This is not Pimp My Ride. No tv’s are going inside this. They are going on top of it silly. I used a 1×2 for the top and a 1×4 on the bottom. I mitered the corners at 45 degrees to fit. Here’s where you can get creative though, I used my router and made my own rounded edge trim for decorative purposes. If you’ve got a router you can do the same (I just used a round over bit), or you can just buy trim pieces from the store. I chose 1×2 and 1×4 because they are fairly standard widths for trim in case I was too lazy to make my own. Surprisingly I wasn’t. I attached these with wood glue and brad nails, then caulked up any edges. Not to sound product placement’y but I got to try out the new Bandy Clamps from Rockler on this portion of the build and they were perfect for holding the trim up as I attached it.
One thing of note, I did not run trim around the back of the unit. Instead, the trims ends with a flat edge but with a slight overhang. Like an 1/8th to a 1/4 of an inch overhang. Why? Because the back of the unit is going to be covered with thin plywood underlayment. This way the trim will overhang just enough to sit flush with the underlayment. Anything extra I cut off until it was flush.
Step 7 Cabinet Door Assembly

If you’re thinking this step will be Deja Vu for building the panels, you’re half right. The doors are actually smaller than the panels, so you don’t just get to use your 1×8’s at normal size. They have to hit the treadmill and lose a few inches before they make their debut. Yes, I just fat shamed a cabinet door. The cabinet door opening is going to be around 19.75″ x 27.00″. You do not want to cut your doors to that exact size, you actually want to make them a little smaller because you want an equal gap around the door when it sits in the frame so it easily opens and closes. I typically cut my measurements down a 1/4″ on the height and width so that gives me an 1/8″ gap around to fit properly. The measurements I’m giving you for the door panels in the image are for a flush fit, not the trimmed down measurement. The two outside pieces of the panel are 1×8’s cut down to 7-1/8″ x 27.00″. The middle pieces is a 1×6″ at the same length.
DO NOT ATTACH WITH POCKET HOLES LIKE THE PREVIOUS PANELS. We’re going to go all fancy and hide the pocket holes with the trim work. If you don’t care about the holes showing in the back or you want to patch them like the previous unavoidable pocket holes, then you can skip this step. I wanted the doors clean so once I had my panels the correct size, I laid out my trim work for the X’s like I did for the side panels. The slight difference is you need to add the 1×4 trim around the outside border, then measure and lay out your X’s. I traced directly onto the panel where the trim work would go and then placed my pocket holes for the panel, assembled, then attached my trim work. The finished door hopefully looks like this: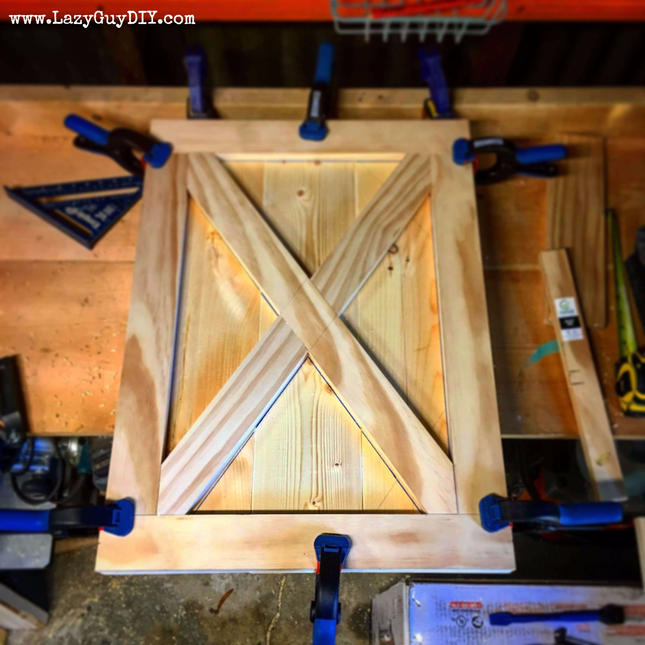
Once again I used my Bandy Clamps to secure pieces down. Then I used wood glue and my brad gun to attach everything. You can always go back and sand your outer edges to smooth them out. Or, if you screw up like I did (and the door is just a little too big) I just ran mine doors through the table saw and had to trim down a tiny bit so the doors fit a little better. Bonus, that makes for smooth edges.
Step 7.2 Attaching The Doors
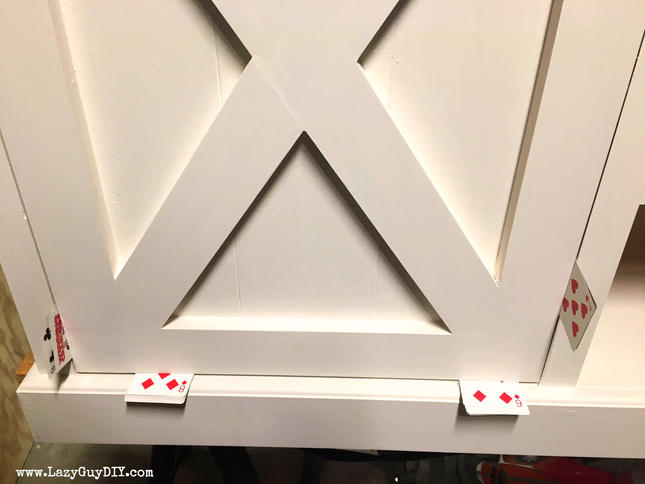
Credit Brad from Fix This Build That with this trick. I’d say go follow him, but he’s already got 100k people that check out his stuff, so instead double check you’re following me on social media. Ha. Use playing cards to properly space your doors before you attach the hinges. This makes sure you have equal spacing all the way around the frame before you make things permanent. It’s a real life saver. After spending hundreds of dollars on hardware and rejecting everything, I ended up using really affordable Everbilt 3″ x 3″ Black Tee Surface Mount Hinges for the doors (they come in pairs) and Everbilt 7 1/2″ Black Heavy Duty Gate Pull for the handles. I had every intention of using frameless-inset hidden hinges on this project. I even used my fancy new Kreg Jig Hidden Hinge System… then found out the doors are too thick to use hidden hinges. They are 1.50″ thick when you include the trim, the hinges are only good for 0.75″ inset. Whoops. Exposed hinges it is! I also attached magnetic catches on the inside so the doors stay closed. They are cheap and easy to find at any hardware store.
Step 8 Top Assembly
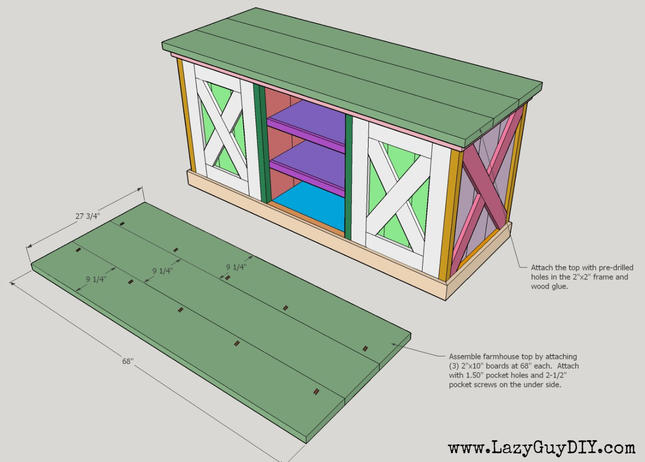
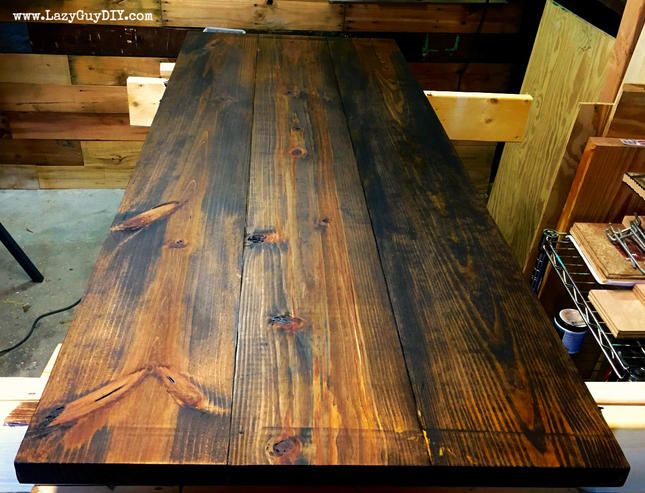
Full disclosure, I started the top before ALL of the other steps. I knew exactly how big it was going to be and I knew there would be multiple coats of poly going on it. So you can cut and assemble the top anytime you feel like it. Perhaps while you are waiting for your paint or wood filler to dry? This is another time I used my Thickness Planer where it’s absolutely optional for you if you don’t have one. I ran the 2×10’s through to get rid of that rounded edge that 2x material comes with. If you don’t have a thickness planer or a jointer, you can leave the little gap the butt joint makes (which is totally fine) or you can even fill it with stainable wood filler (prior to staining) like I did on my farmhouse benches. Total preference. The 2×10 planks are cut to 69.50″ each which gives you about an inch of overhang on each end. The total width will be 27.50″ which gives you about 2.00″ to work with. I gave the front a 1.50″ overhang and the back got 0.50″. You attach the planks together with 1.50″ pocket holes and 2-1/2″ pocket screws. You don’t have to patch these pocket holes because they are going to be hidden underneath. For stain on this piece I applied one coat of MinWax Espresso (make sure you sand the piece with 220 grit first) and then applied three coats of MinWax Semi-Gloss Poly. As always, make sure your surface is absolutely clean before applying poly, then between coats, hand sand the poly coat with 300+ grit sandpaper for a smooth to the touch feel. ABSOLUTELY DO NOT USE AN ELECTRIC SANDER! This has to be done by hand or you’ll take too much off. Wipe the surface clean and repeat. Each layer will get smoother and smoother as you apply another coat and sand and reapply.
*Before you attach the top, make sure the final coat of paint is on the unit. You don’t want to try and touch things up and get it on to your nicely stained top.
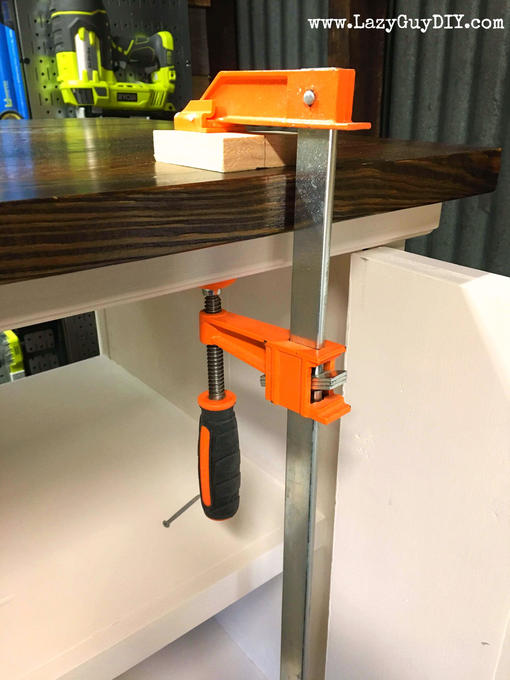
I pre-drilled holes (normal holes, not pocket holes) into my top frame and attached the top with 2-3/4″ wood screws. Double check my math here… but a 1.50″ top and a 1.50″ frame mean I have 3.00″ of material to work with and a 2-3/4″ screw would be perfect, right? Of course it is! I’m a professional* here. (*I am not a professional). This is another opportunity to use your clamps! As I attached the top, I clamped the edge to remove any gaps. You don’t want to damage your nice new farmhouse top, so use a scrap piece of wood between your clamp and the surface.
Step 9 Back Panels
There’s no fancy diagram here. I picked up three pieces of 2’x4′ underlayment at Home Depot (it’s usually around $5) and cut them to fit across the back. Make sure the overlap happens in the middle of the two 2×2 frame pieces.
I stained the pretty side (yes there’s a nice side and an ugly side) to match the Espresso on top and the back I painted the same color as the unit. I then cut a hole in the middle panel to run wires out of. I attached with wood glue and brad nails. This is the back of the unit that no one will see so there’s no fancy tricks here. So why attach the back panel at this point and not any sooner? Because I said so generally would suffice here, but honestly, between attaching the top, painting the inside and attaching the shelves, you want full access to all sides of this unit. Otherwise you’ll need to contort yourself in ridiculous ways to reach the tough to get to spots. And you’re done! Seriously. Nothing else. Why are you still here? This is like the ending of Ferris Bueller and you’re still watching the credits. Here’s one last shot of my sweet baby angles!
If you have any questions about this massive build please feel to reach out to me! And of course, as always, send me pics of your finished project! I’ll happily put them up on my social media.
~Lazy Guy


Beautiful!!!!!!!! Can you tell me the exact paint colors you used for the wood? I love the colors!
Hi Nicole! The white paint is a Behr color called “Polar Bear” and the stain is MinWax Jacobean. If you build this let me know, I’d love to see a pic of it!
Do you have any advise on doing hidden hinges on the door? We love this project and are about half way through. We doubled the size though (yup, 10 feet long!).
10 feet???? Wow! Definitely send me pics of this when you’re finished. Hidden hinges all come down to which ones you buy, there are like 6 variations and it’s ridiculously confusing even when you think you have the right ones. You’re specifically looking for “Inset Euro Hinges”. No overlay. https://bit.ly/2LRqyEm check those out, hopefully your store has them! Even when I ordered hinges from places, they still sent me the wrong ones, so I ended up going with the gate hinges you saw on the final piece. The Kreg Hinge Jig is also a ton of help for installing: https://amzn.to/2LYBiRG
How did you hide the pocket holes on the outside panels? Wood filler? Lots of it?
Magic! I did two things. All of the outer walls are a pair of 1x panels sandwiched together. So the pocket holes joining the wall panels together are all inside facing in the sandwich and hidden. Any other pocket holes are strategically placed and hidden behind the trim work.
I must have missed that part on the outer panels we did it for the inner panel walls
Way too many ads to be able to see this project which I’m interested in. Frustrating.
Hey you’re right, I had an update recently and those are new. That’s something I’ll update. I also have the plans on Kreg Tool’s site that’s a straight step by step build plan. Just search Lazy Guy DIY Leonard media console.
Hello LG
Getting ready to attempt this project. Could you clarify how many panels are 2 to a pair? Are all 4 panels pairs of 2 to hide the pocket holes or just the Inside panel assembly covered in Step 4? I dont see that you built 2 and sandwiched the 2 outside panels in Step 3. Thank you
The outer panels are singles. That way when you add the trim it’s a combined thickness of 1.50″ with the outer panels. Then as you said, the pocket holes are facing inward and need to be patched. The inside panels on step 4 are the only sandwiched pairs. So four identical panels assembled and sandwiched into pairs for the two inside walls on step 4. Let me know how it goes!